Advertisement
Small kitchen chaos is a universal experience. One minute your counters are clear, the next a tower of snacks and spatulas is auditioning for a Jenga tournament. The good news? You don’t need a full remodel—just smart systems that stay tidy on autopilot. Let’s set up your space so it works hard, looks chic, and stays organized for the long haul.
1. Vertical > Horizontal: Build Storage Up, Not Out
© 2025 AI Illustrator — Inspiration Only
Counter space is prime real estate. If you’re using it for jars, canisters, and “cute” clutter, you’re losing the game. The fix: go vertical and use your walls like an extra cabinet.
What’s Your Apartment Decor Style?
Answer these quick questions to discover your perfect decor vibe.
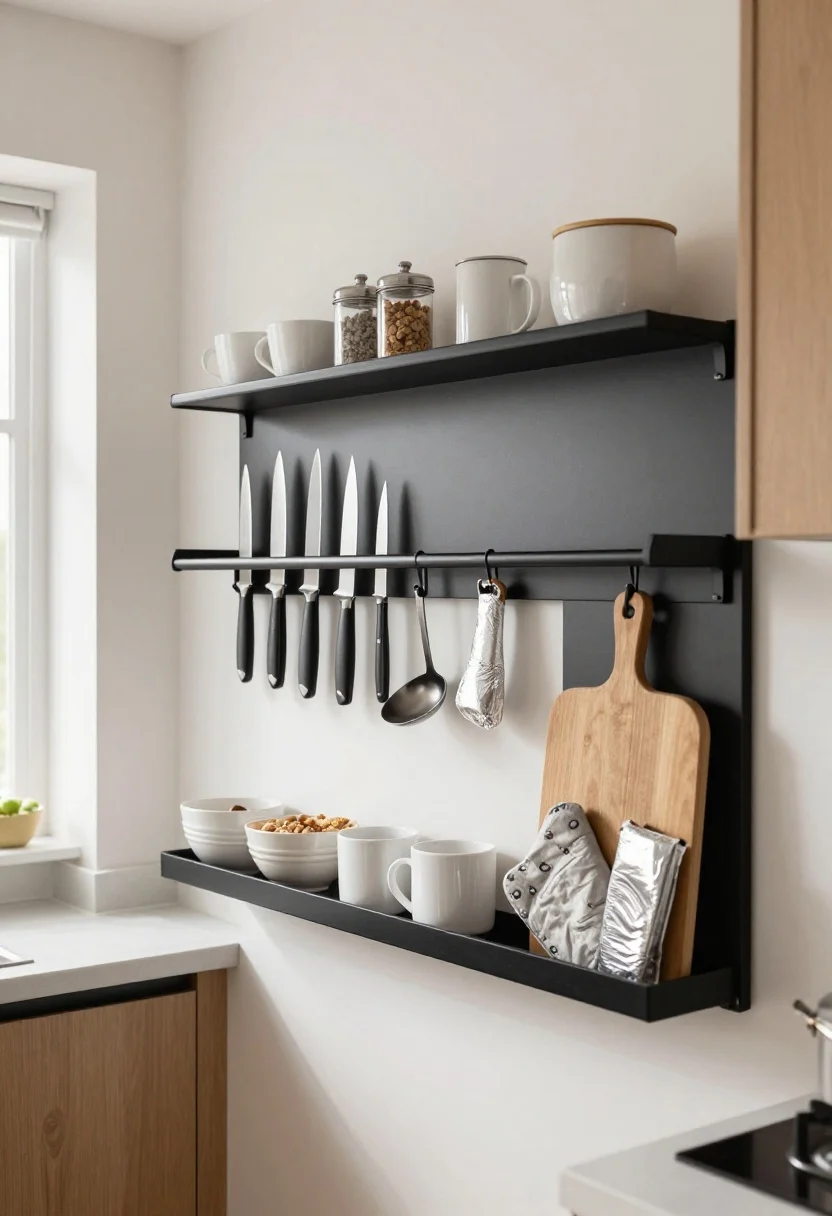
Smart Ways To Go Vertical
- Magnetic strips for knives and metal spice tins—free up a whole drawer and keep sharp stuff safe.
- Rail systems with S-hooks for ladles, strainers, and mitts—instant chef vibes.
- Floating shelves for daily-use mugs and bowls—keep them shallow so nothing disappears.
- Over-cabinet door racks for cutting boards, wrap, or cleaning supplies—hidden but handy.
Long-term win: vertical storage keeps daily tools visible and reachable, which means you actually put them back. FYI, that’s the secret to maintenance.
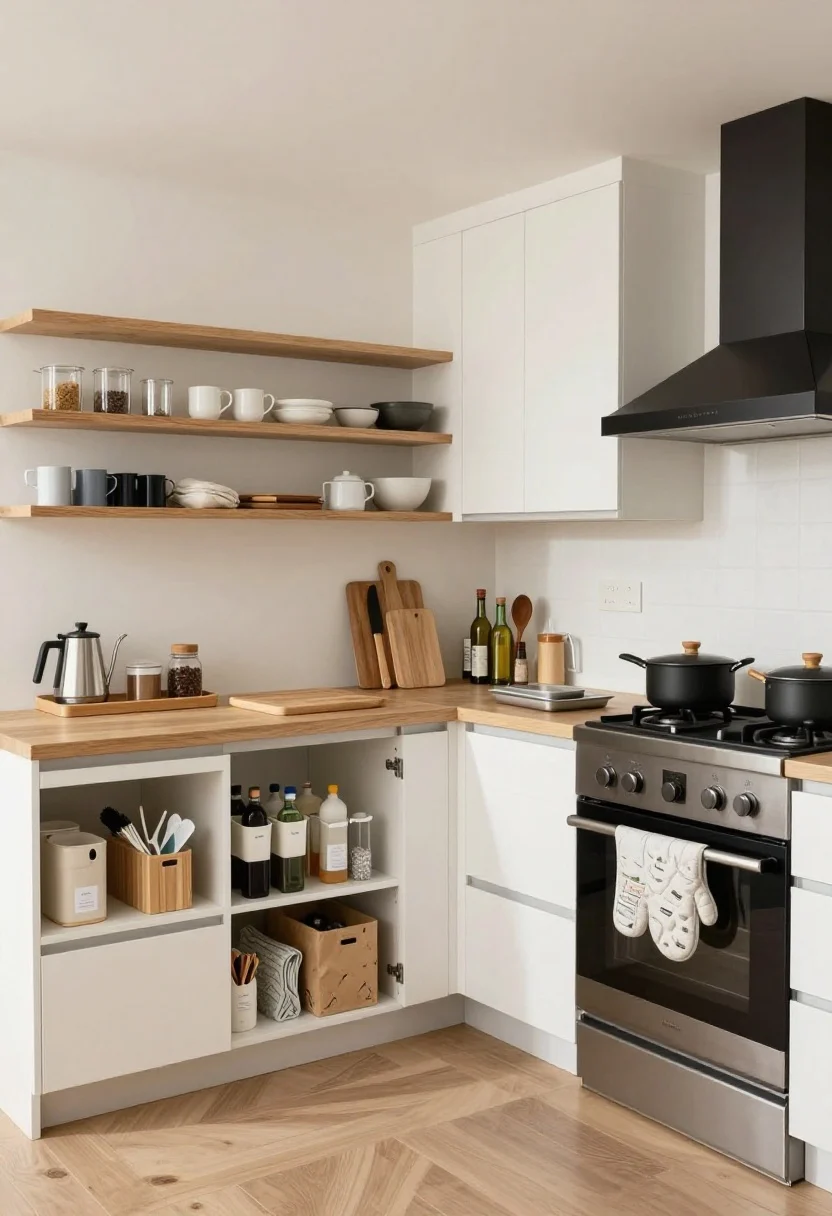
2. The Zone Method: Give Every Task a Home (And Stick To It)
© 2025 AI Illustrator — Inspiration Only
Mess happens when items migrate. Create zones based on what you do most and store everything needed for that task right there.
Core Kitchen Zones To Set
- Coffee/tea station: mugs, filters, beans, kettle, sweeteners. One tray, one drawer, done.
- Prep zone: cutting boards, knives, mixing bowls, oils, salt/pepper. Keep it near the largest counter.
- Cooking zone: pots, pans, wooden spoons, oven mitts, sheet pans—park them by the stove.
- Cleaning zone: dish soap, brushes, towels, compost bags under the sink (use caddies!).
Label shelves or bins so guests (and sleepy you) know where things live. Zones reduce decision fatigue—less thinking, more cooking.
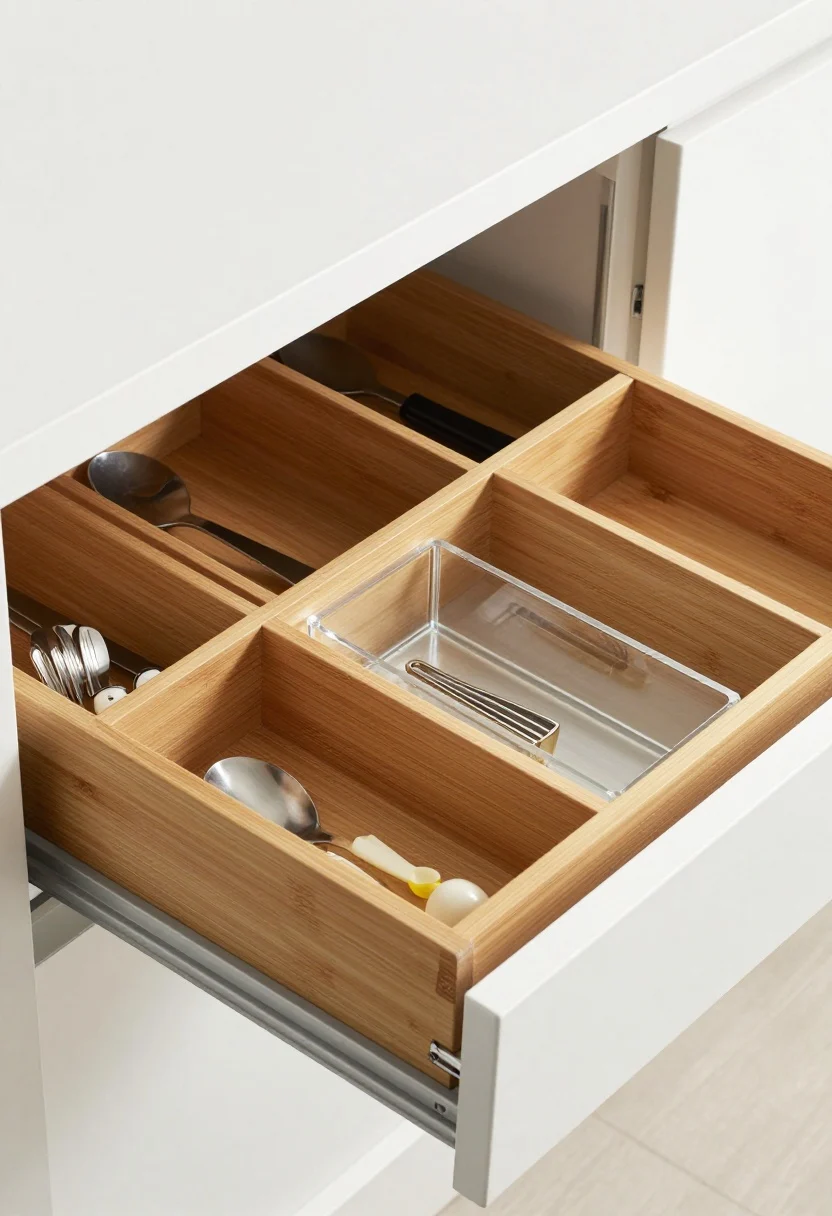
3. Drawer Dividers That Don’t Budge
© 2025 AI Illustrator — Inspiration Only
If your utensil drawer is a scrapyard of whisks and crumb dust, let’s fix that with custom-fit dividers. The trick is to measure your tools and create lanes they can’t drift out of.
Make Your Drawers Behave
- Expandable bamboo or acrylic dividers for cutlery and tools—tighten them so they stay put.
- Knife dock or in-drawer block if you’re anti-magnetic strips—safe and sleek.
- Shallow bins for odds and ends like bag clips, peelers, and wine stoppers—one category per bin.
- Non-slip drawer liners so nothing slides when you slam the drawer after too much espresso.
Bonus: edit your collection first. Keep one MVP spatula, not five mediocre backups. Less stuff = easier systems.
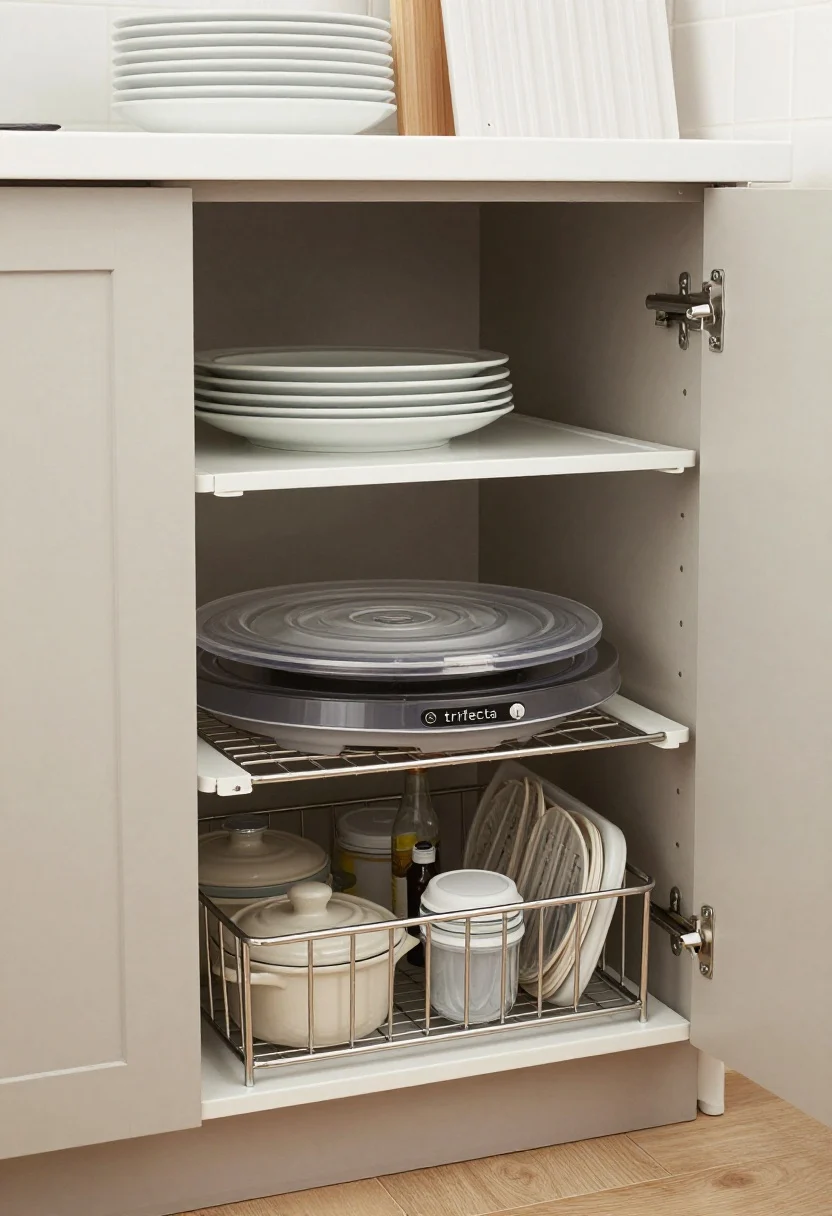
4. Shelf Risers, Lazy Susans, And Pull-Outs: The Cabinet Trifecta
© 2025 AI Illustrator — Inspiration Only
Cabinets are tall caverns where jars go to vanish. You’ll want levels, turntables, and pull-outs to use every inch without digging.
Cabinet Upgrades That Pay Off
- Risers for canned goods, bowls, or plates—stack without creating a leaning tower.
- Lazy Susans for oils, sauces, and snacks—one spin, instant inventory check.
- Pull-out baskets or glide-out shelves for pots, appliances, and Tupperware—no more crouch-and-pray.
- File cutting boards vertically using an adjustable rack—so much better than a wobbly pile.
Choose materials that wipe clean and won’t warp. Long-term organization is all about durability plus ease of access.
5. Decant Smarter, Label Louder
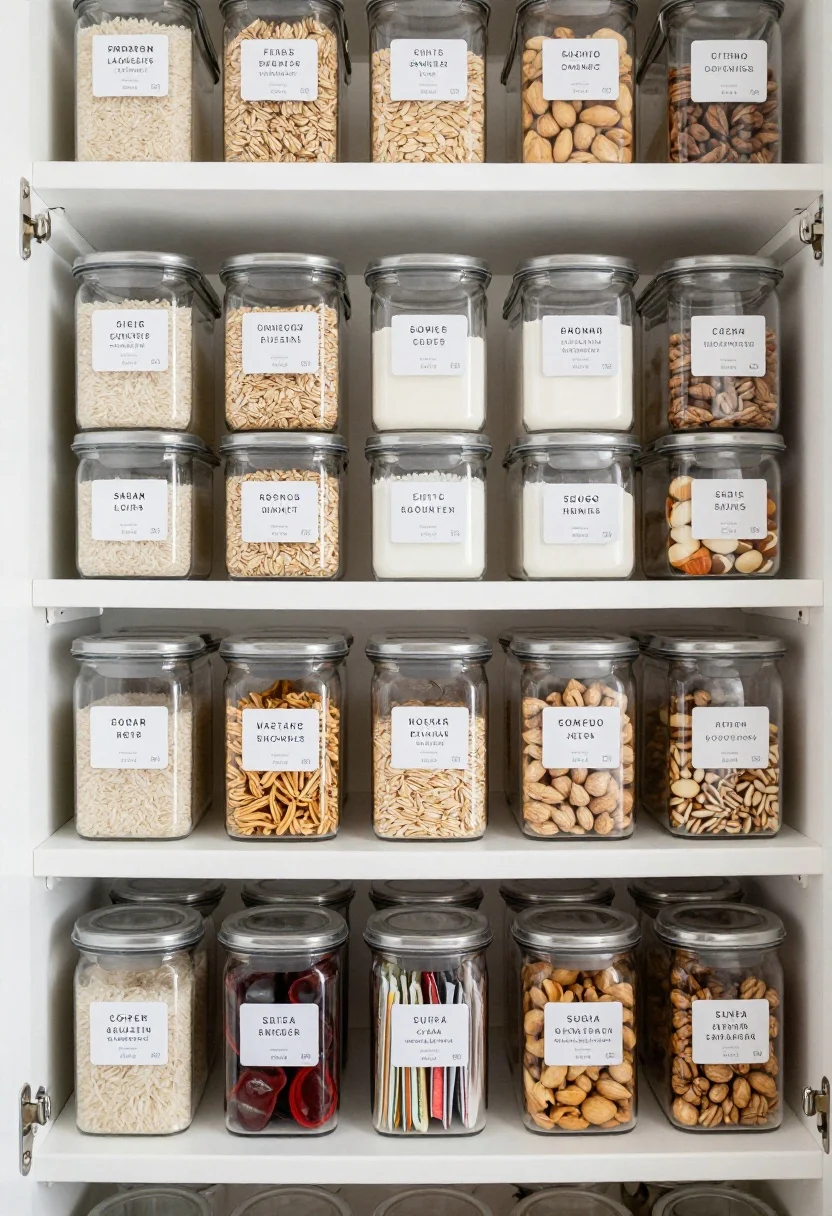
© 2025 AI Illustrator — Inspiration Only
Decanting is not just for people with beige pantries on Instagram. It saves space and makes inventory effortless—no more three half-used pasta bags sneaking around.
What To Decant (And What To Skip)
- Do decant: staples like rice, oats, flour, sugar, nuts, snacks. Use airtight containers with uniform shapes to stack.
- Skip decanting random specialty items you use once a season—just clip and corral in a bin.
- Label clearly with bold, readable fonts and dates. No mystery powders, please.
- Use small bins for packets (sauces, teas, seasoning)—think “mini convenience store.”
Hot tip: pick two container sizes max so your shelves look clean and everything actually fits. IMO, matching lids are a life upgrade.
6. Use Dead Space: Sides, Backs, And Insides
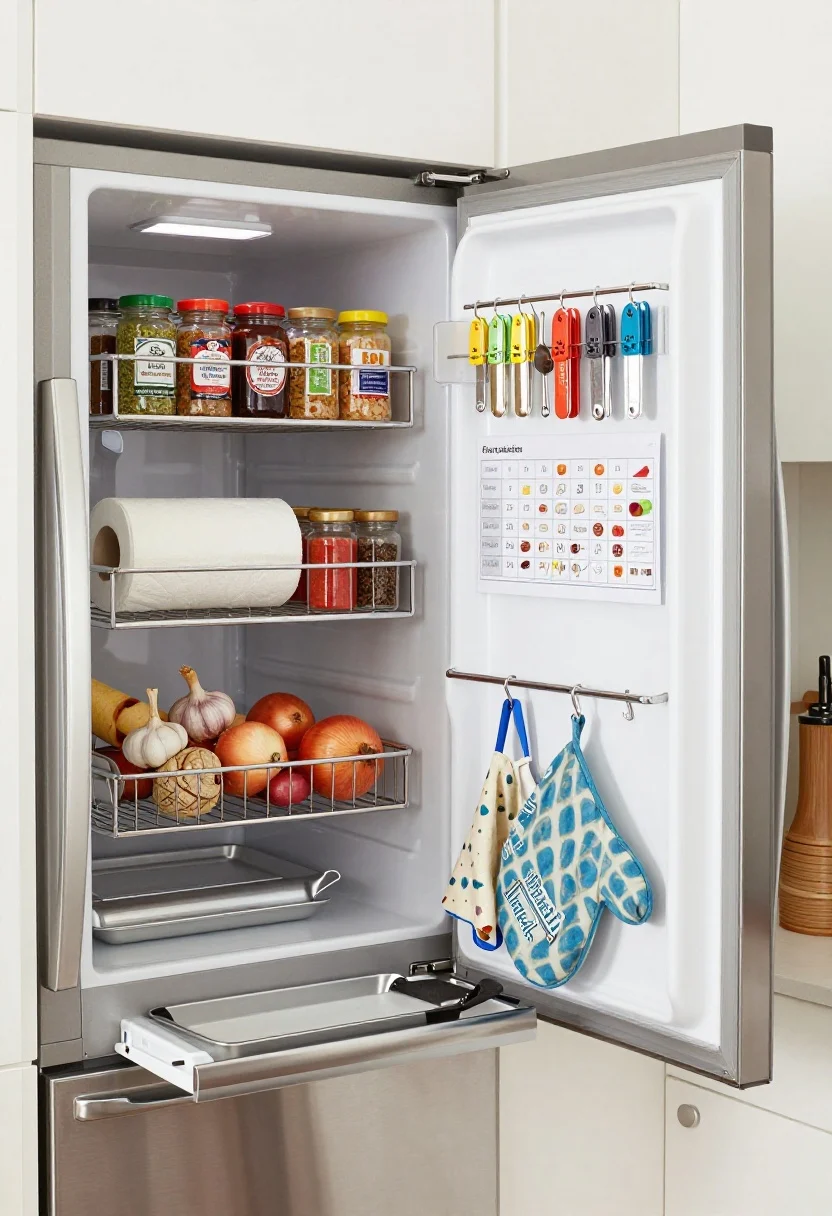
© 2025 AI Illustrator — Inspiration Only
Tiny kitchens hide “bonus” storage in places you’re ignoring. Tap the side of your fridge, the backs of cabinets, and the insides of doors for stealth organization.
Hidden Spots To Exploit
- Fridge side: magnetic shelves for spices, paper towels, or a mini produce basket for onions/garlic.
- Inside cabinet doors: slim racks for wraps/foils, spice clips, measuring spoon rails, or a conversion chart.
- Back of the pantry: command hooks for aprons, mitts, reusable bags.
- Toe-kick drawers: if you’re renovating, slide-out baseboard drawers for sheet pans or pet bowls.
These micro-additions keep everyday clutter off the counters without costing your firstborn. Little things, big impact.
7. The One-In, One-Out Rule (And A Quarterly Declutter Date)
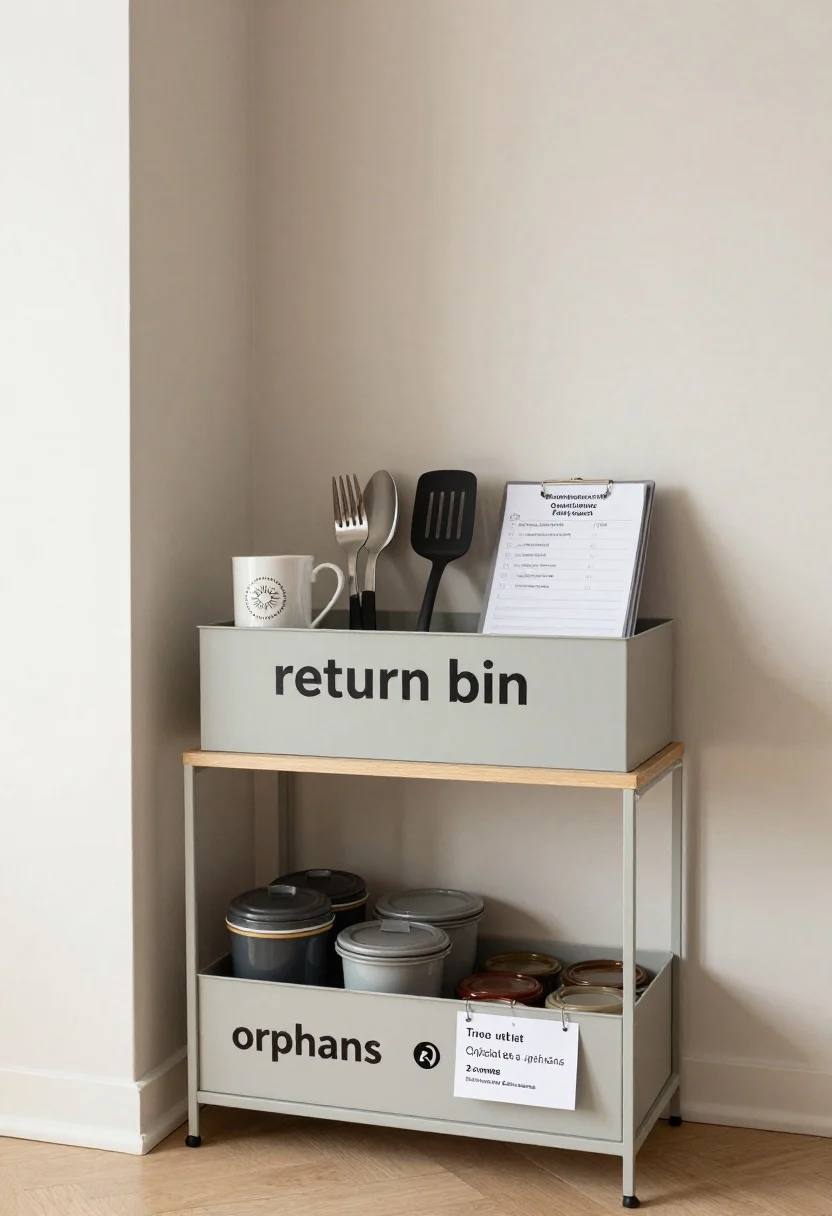
© 2025 AI Illustrator — Inspiration Only
Organization fails when stuff multiplies. Set a simple rule: when something new comes in, something old goes out. It’s harsh but effective—like a tiny kitchen bouncer.
Make Maintenance Automatic
- Schedule a 30-minute pantry reset every 3 months—check expiry dates, wipe shelves, re-label.
- Donate duplicates (spatulas, mugs, party platters you never use)—someone else will love them.
- Keep a “return bin” for loaners and extras near the door so things actually leave your house.
- Track “orphans” like lidless containers—set a two-week reunion deadline, then recycle.
Long-term order hinges on habit, not just hardware. Build tiny rituals and your kitchen will practically tidy itself. Well… almost.
8. Style Meets Function: Make It Pretty So You’ll Keep It Pretty
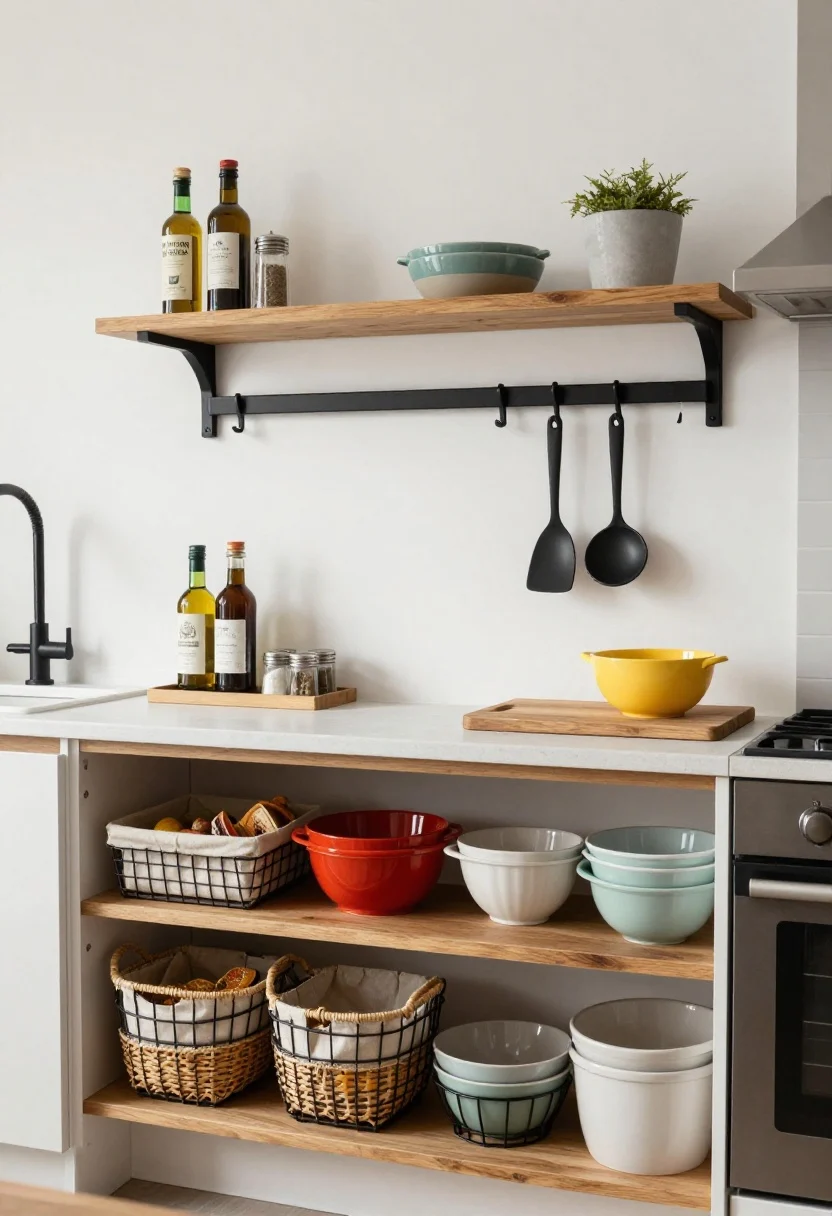
© 2025 AI Illustrator — Inspiration Only
Here’s the secret sauce: when your system looks good, you’re more likely to maintain it. Choose storage that matches your vibe so organization becomes part of the decor.
Design-Forward, Still Practical
- Color palette: pick two neutrals and one accent (e.g., white + wood + matte black) for containers and hardware.
- Counter trays: corral oils, salt, and a small plant on a stone or wood tray—intentional, not cluttered.
- Textured baskets: rattan or wire with liners for snacks or produce—easy to grab, cute to leave out.
- Matching hooks and rails: matte metal finishes elevate even a $10 rail system.
FYI: open storage works best when you curate. Display the pretty cutting board; hide the neon mixing bowls. Balance, not perfection.
Quick Starter Kit (If You Buy Just A Few Things)
- Magnetic knife strip and a 12-inch rail with S-hooks
- Two lazy Susans, two shelf risers, two pull-out baskets
- Stackable airtight containers + bold waterproof labels
- Expandable drawer dividers + non-slip liners
Wrap-Up: You don’t need a bigger kitchen—you need smarter systems. Build up your walls, divide your drawers, turn dead space into MVP storage, and keep the look cohesive so you actually maintain it. Start with one zone this weekend, then layer in the rest. Your counters (and your sanity) will thank you.