Advertisement
You live in one room that must do it all: sleep, eat, work, unwind. The usual mistake? Shoving furniture against every wall and hoping a rug will “make it feel like zones.” It won’t. You want a studio that looks intentional—where the bed disappears visually during the day, the desk doesn’t stare at you at night, and guests instantly understand where to sit. This guide shows you exactly how to separate spaces in a studio apartment with smart zoning: what to decide, what to buy, what to skip, and how to avoid layout traps.
Quick Answer
If you need fast separation in a studio without building walls: use a room-defining rug under the seating area, a double-duty bookcase or curtain track to divide sleep from living, and a tightly edited color palette per zone (two main colors + one accent). Layer lighting at three heights—floor, table, overhead—so each zone has its own mood. Start with the largest zone (usually living), anchor it with a 5×8 or 6×9 rug, then add a tall, open divider behind a loveseat or at the bed’s foot. Finish with dimmers and storage ottomans to keep visual noise low.
| Idea | Best For | Budget Level | Mistake To Avoid |
|---|---|---|---|
| Ceiling-Mounted Curtains | Renters, soft separation for sleeping | $ | Mounting too low; use ceiling tracks, not tension rods that sag |
| Open-Back Bookcase Divider | Zoning living/bed with storage | $$ | Choosing closed backs that block light and shrink the room |
| Platform Bed With Storage | Max storage and visual boundary | $$$ | Skipping soft-close drawers; noisy hardware ruins small-space calm |
| Area Rug Layering | Fast definition of living/dining | $–$$ | Rugs too small; front legs of seating must sit on rug |
| Accent Paint or Peel-and-Stick | Creating focal points on one wall | $ | Dark paint in dim corners; light balance matters |
© 2025 AI Illustrator — Inspiration Only
What’s Your Apartment Decor Style?
Answer these quick questions to discover your perfect decor vibe.
1) Create a Soft Bedroom Nook With Ceiling-Mounted Curtains
© 2025 AI Illustrator — Inspiration Only
Problem scene: Your bed stares at the front door, and you hate that guests see your pillows before they see your face.
Why it works: Curtains give you human-scale separation without killing daylight. The vertical lines add height, absorb sound, and soften hard edges. From a design perspective, you’re shaping flow and privacy with texture, not bulk, keeping sightlines airy and ceilings feeling taller.
- Install a low-profile ceiling track 6–10 inches from the ceiling on two or three sides of your bed zone. Curved tracks help turn corners cleanly.
- Choose washable, medium-weight panels (linen blend or twill) in a light, warm neutral. Hang them to just kiss the floor for a tailored look.
- Layer a blackout panel behind a sheer if you face street lights; keep sheers closed by day to blur the bed.
- Add a warm 2700K bedside lamp with a dimmer and a small, lidded bedside basket for cords and remotes to cut visual clutter.
Budget note: Skip tension rods—they sag. A basic aluminum ceiling track kit is affordable and renter-friendly because holes are small and patchable.
With the bed softened, you can now define a living zone that feels separate but bright.
2) Use an Open-Back Bookcase as a Light-Passing Divider
© 2025 AI Illustrator — Inspiration Only
Problem scene: You pushed a solid wardrobe between bed and sofa and now live in a cave.
Why it works: An open, grid-style bookcase separates zones while maintaining light flow and sightlines. The repeated verticals create rhythm and a clear boundary without adding heaviness. It also adds vertical storage, which keeps floor space clear and traffic lanes obvious.
- Pick a 72–80 inch tall unit with cubbies at least 12 inches deep; open back is key. Secure it to the wall or the ceiling for safety.
- Place it perpendicular to the longest wall, lining up its edge with the sofa’s back to define the living zone.
- Style 60% open (plants, books, bowls), 40% concealed (woven baskets with lids) to balance texture and hide mess.
- Repeat one material (black metal or light oak) that matches existing hardware for cohesion.
Mistake to avoid: Closed-back units or stuffed cubbies that block light and feel bulky. Leave negative space so the divider reads architectural, not storage-shed.
Once the divider’s in place, rug sizing becomes the next big move to lock in layout.
3) Anchor the Living Area With the Right Rug (And Scale Everything Off It)
© 2025 AI Illustrator — Inspiration Only
Problem scene: Your 4×6 rug floats under a coffee table while the sofa and chairs hang off like an island. Everything feels scattered.
Why it works: Rugs create visual rooms. Getting the size right aligns furniture scale, controls traffic flow, and sets a cohesive color palette. The eye reads a continuous plane, which tricks a small space into feeling ordered and bigger.
- Measure seating. Choose at least a 5×8 rug; 6×9 or 8×10 often works better in studios so front legs of all seating sit on it.
- Keep pattern low-contrast if your room is tiny; flatweave or low pile is easier to clean and move.
- Match undertones: if your sofa is cool gray, pick a rug with cool base; warm beige sofa pairs with warm taupes or rusts.
- Use rug pads cut 1 inch smaller on all sides to avoid curling and slipping.
Budget tip: Buy a neutral base rug and layer a smaller vintage or patterned 4×6 in the center to add character without paying for a giant handmade piece.
With the living zone anchored, set up dining or work in a way that doesn’t choke circulation.
4) Float a Mini Dining or Work Zone Without Blocking Traffic
© 2025 AI Illustrator — Inspiration Only
Problem scene: A big, rectangular dining table blocks your only path from door to bed. You keep bruising your hip.
Why it works: In studios, circulation is a design element. Compact, round, or wall-mounted surfaces respect traffic lanes and create functional niches. A floating work table can double as dining, and your lighting can act as a visual boundary.
- Map paths: front door to sofa, sofa to bed, bed to bath. Keep 30–36 inches clear for main routes; 24 inches minimum for secondary.
- Choose a 30–36 inch round pedestal table or a 24-inch wall-mounted drop-leaf. Pedestals tuck chairs in tighter.
- Use two armless chairs with slim legs and washable performance fabric. For a desk, pick a 40–48 inch console with closed drawers.
- Hang a small pendant or add a plug-in sconce centered over the surface at 28–34 inches above tabletop; use 3000K bulbs for task clarity.
Mistake to avoid: Oversized chairs with arms—they eat space and snag traffic. Choose narrow profiles and match metals to your cabinet hardware for continuity.
Now that your pathways are clear, a color and texture strategy can do quiet heavy lifting for visual separation.
5) Zone by Color and Texture, Not Just Furniture
© 2025 AI Illustrator — Inspiration Only
Problem scene: Every surface is the same gray. The studio reads as one big, flat blur, and nothing feels “meant for” anything.
Why it works: Color temperature and texture act like invisible walls. Shifting one zone slightly warmer or more tactile sets a mental boundary without adding bulk. A matte paint finish absorbs light and quiets a sleep zone, while satin or eggshell keeps living areas lively and easy to clean.
- Pick a unified base (soft white or pale greige) for all walls to keep light consistent; then add a single accent wall or mural behind the bed using peel-and-stick for renters.
- Assign textures: nubby boucle throw and linen curtains in the sleep nook; smoother leather or tight-weave upholstery in living.
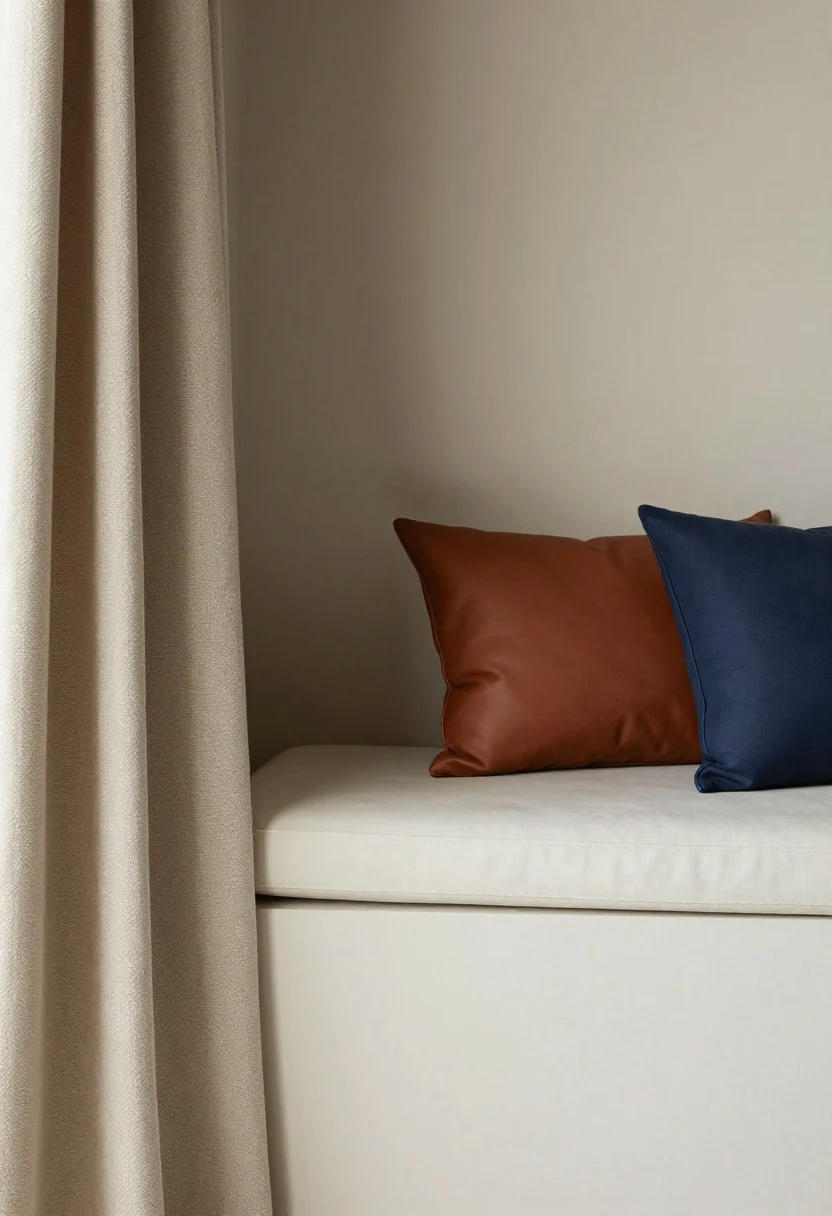
- Repeat an accent color per zone: deep olive in bed textiles; rust or navy in living pillows and art. Limit to 2 colors + 1 neutral per zone.
- Use matte for the headboard wall, eggshell for living/dining walls. Semi-gloss only for trim; too shiny bounces glare in small rooms.
Budget note: Paint is the cheapest divider. If you can’t paint, use large, framed fabric or peel-and-stick panels to mimic an accent wall; choose removable options with a low-tack adhesive.
Once your palette curves around each function, hidden storage is the difference between calm and chaos.
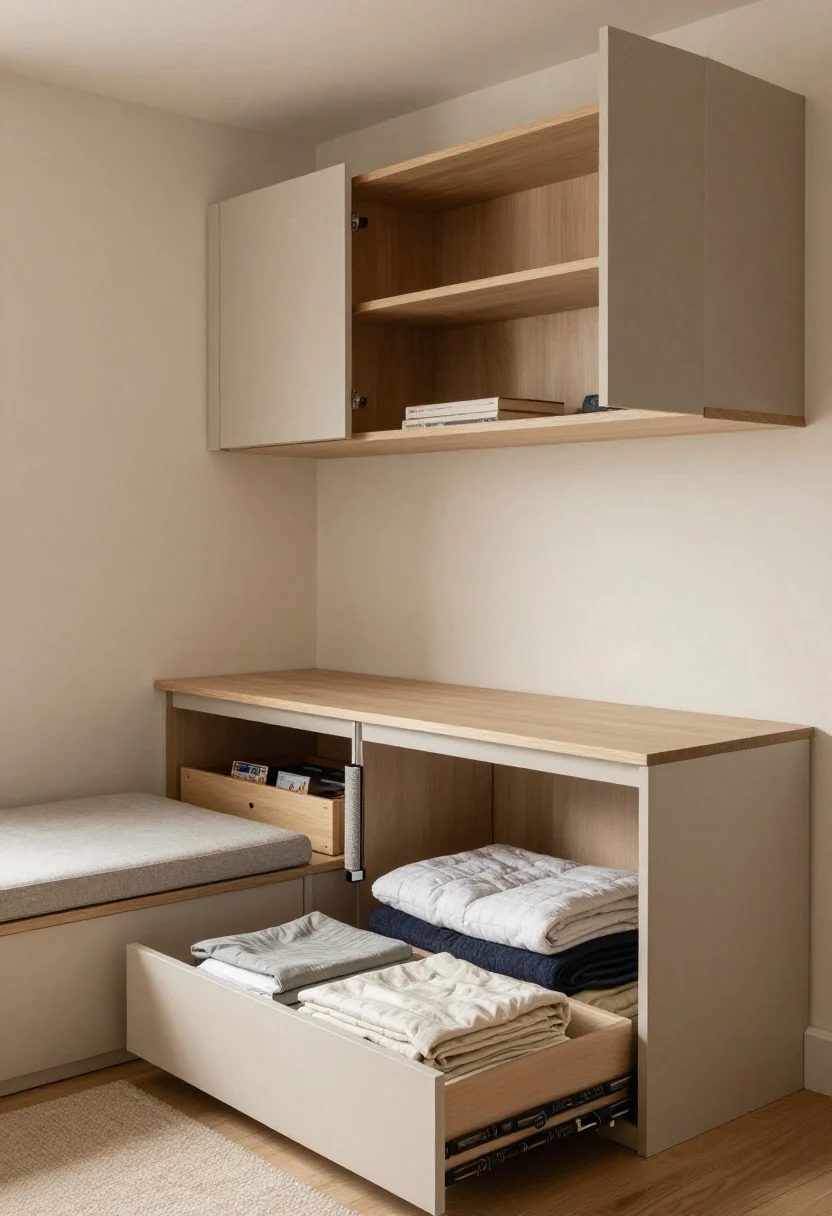
6) Build Storage Into Boundaries So Clutter Doesn’t Bleed Across Zones
© 2025 AI Illustrator — Inspiration Only
Problem scene: Mail, gym gear, and cables overflow from desk to coffee table to nightstand. The whole studio looks “in progress.”
Why it works: In small spaces, every zone needs a “landing pad” for its own mess. Storage that doubles as a boundary—platform beds, storage benches, media consoles—keeps stuff contained to its originating zone. Visual calm equals perceived square footage.
- Choose a platform bed with 10–12 inch deep drawers; look for soft-close hardware to keep noise down.
- Use a storage bench or trunk as a coffee table with a tray on top; stash blankets, games, or extra pillows inside.
- Add a slim, closed-door media console (12–16 inch depth) to hide routers and cords; use cord clips and a cable sleeve.
- Install 10–12 inch deep floating shelves above the desk only; stop them 6 inches before a corner so they don’t visually run into the next zone.
Mistake to avoid: Open storage everywhere. Mix closed cabinets and lidded baskets with a few open moments so the eye can rest.
With clutter contained, lighting becomes the final layer that makes zones feel distinct but cohesive.
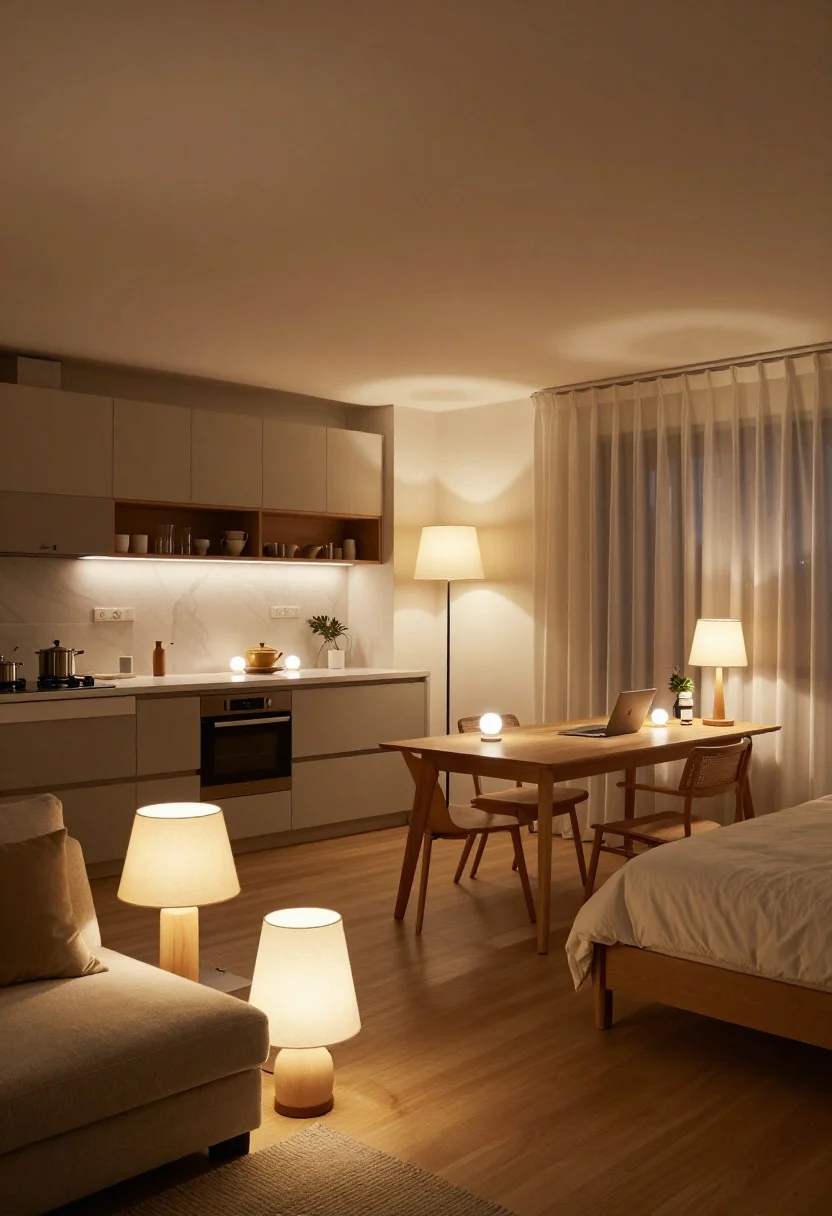
7) Layer Lighting at Three Heights to “Dim the Other Room”
© 2025 AI Illustrator — Inspiration Only
Problem scene: One ceiling light makes your whole studio feel like a waiting room. No ambiance, no separation.
Why it works: Zonal lighting creates edges. Overhead, mid-level, and low-level light control where attention goes. Warmth variation helps: cooler for tasks, warmer for rest. Dimmers let you reduce visual noise in areas you’re not using.
- Overhead: replace cool bulbs with 3000K in kitchen/work areas, 2700K in sleeping/living. Add smart bulbs and a cheap wall-mounted remote.
- Mid-height: a swing-arm or plug-in sconce near the dining/desk surface at eye level (60–65 inches from floor) focuses that “room.”
- Low: a floor lamp beside the sofa and a small table lamp by the bed. Use shades that diffuse, not spotlight.
- Control: put each zone on separate smart plugs/scenes so you can “turn off” the bedroom while entertaining.
Budget tip: Plug-in sconces save on wiring and patch easily when you move. Choose fabric shades in off-white for the most flattering light on skin and textiles.
Dialed-in lighting makes your zones feel intentional, morning to night.
What To Buy / What To Skip
- Buy: Ceiling curtain tracks, open-back bookcase, 6×9 rug, plug-in sconces, storage ottoman, cord management kit, dimmers/smart plugs.
- Skip: Tension rods, tiny 4×6 living room rugs, armchairs with bulky arms, closed-back dividers, glossy paint on large walls, open wire shelving in sleeping areas.
Designer Mistakes To Avoid
- Pushing all furniture to walls. Floating a loveseat or bookcase creates better flow and makes the center useful.
- Using the same lamp color temperature everywhere. Mix 2700K and 3000K to shift mood by zone.
- Buying storage without lids or doors. Visual clutter travels; closed storage pins it down.
- Choosing tall, dark dividers in dim apartments. Prioritize light-passing materials and lighter tones.
- Not measuring walking paths. Leave at least 30 inches for main circulation; you’ll feel the difference daily.
Budget-Friendly Alternatives
If you’re watching costs or renting, you can still zone smartly.
- Instead of a pricey room divider, use a double curtain layer: sheer for day, blackout for night, on a ceiling track.
- Swap a platform bed for underbed rolling bins with fabric skirts to hide them.
- Layer an inexpensive jute or sisal base rug with a smaller patterned rug for character.
- Choose peel-and-stick wood-look planks or murals to define a zone without paint.
- Use a narrow console table behind the sofa to stand in as a boundary and add lamp height.
FAQ
How big should the living room rug be in a studio?
Big enough that the front legs of your sofa and any side chair sit on it—usually 6×9 or 8×10 in most studios. A too-small rug makes the zone feel skimpy and chaotic.
What’s the best renter-friendly way to hide the bed?
Ceiling-mounted curtains on a low-profile track. They install with small anchors, move silently, and soften the room. Sheer by day, blackout at night.
Can I use a wardrobe as a divider?
Only if light is abundant and the unit is shallow (15–20 inches) and finished on both sides. Otherwise, choose an open-back bookcase to keep the space bright and safe.
How do I keep my zones from feeling mismatched?
Pick one unifying element across zones: same wood tone, same metal finish, or one repeating accent color. Vary texture per zone for separation.
What lighting should I buy first on a tight budget?
One floor lamp for the living zone and a plug-in sconce or small table lamp for the bed. Add smart bulbs to your existing overhead for instant scene control.
Conclusion: To separate spaces in a studio apartment, start with the easiest backbone decisions—curtains or an open-back bookcase to divide the bed, a properly sized rug to anchor the living area, and layered lighting to carve clear moods. Pick one idea to try first: if privacy is your top pain point, install the ceiling track and curtains; if your layout feels messy, start with the right rug and float your sofa off the wall. These smart zoning moves make one room behave like three—without building a single wall.
Before You Start: Quick Decorating Checklist
- Measure the room before buying furniture or storage pieces.
- Choose one main focal point so the space does not feel busy.
- Repeat at least one finish, texture, or color to make the room feel intentional.
- Check lighting temperature, traffic flow, and cleaning needs before copying the look.
Helpful Product Ideas To Compare
Affiliate disclosure: Some links may be affiliate links. Compare size, material, reviews, and return policy before buying.
- Shop Smart Zoning Separate Spaces Decor — useful for checking price ranges, finishes, and real customer photos.
- Shop Smart Zoning Separate Spaces Storage — useful for checking price ranges, finishes, and real customer photos.
- Shop Smart Zoning Separate Spaces Lighting — useful for checking price ranges, finishes, and real customer photos.